Monday 26 August 2013

Bedtime Yoga

Halloooow para pembaca !

Kali ini saya akan mengulas tentang Bedtime Yoga, daaan, dalam Bahasa :D. 
Bedtime Yoga juga baru beberapa bulan ini saya laksanakan, dan sungguh sangat membantu bagi para pembaca yang sering diterjang insomnia. 
I share 2 versions here, in photo and video. You can choose whatever you want, or just try it both.
Ingat, dalam yoga, semua sistem pernapasan dilakukan melalui hidung, dan tubuh harus selalu dalam posisi tegak (dada terbuka).
Biasanya, saya melakukan masing-masing gerakan dalam 5 napas.
Ready to get to bed ? Below the sequence =) 

1. Short Meditation
Duduk bersila dengan posisi tegak lurus seperti gambar di atas, letakkan bantal dibelakang Anda. Tutup mata Anda dan rileks, rasakan seluruh tubuh Anda rileks dalam posisi ini. Bernapaslah dalam posisi ini untuk beberapa menit. (Biasa saya 3 menit saja cukup :p)

2. Seated Twists
Masih dalam posisi bersila, perlahan2 buka mata Anda, dan ubah posisi seperti pada gambar, dengan posisi dada tetap terbuka dan tegak. Jika kasur Anda memiliki pegangan seperti gambar, maka Anda dapat berpegangan untuk membantu posisi twist. Pertahankan posisi ini dalam 5 napas, dan lakukan untuk sisi yang lainnya.

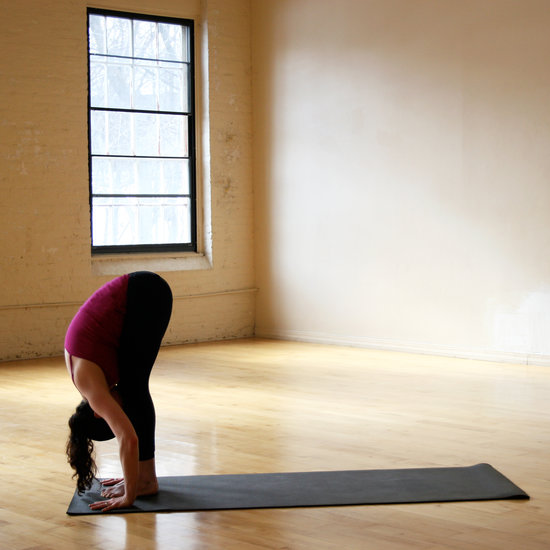
3. Easy Forward Bend
Masih dalam posisi duduk bersila, angkat kedua tangan Anda, lurus disamping telinga. Panjangkan posisi Anda seperti ditarik ke atas, tapi posisi bokong Anda tetap menyentuh kasur. Perlahan-lahan, turunkan dada Anda (! Ingat, yang diturunkan adalah dada Anda) ke depan sampai kedua telapak tangan Anda menyentuh kasur. Rasakan badan dan tangan Anda tertarik panjang ke depan, tetapi bokong Anda tetap menyentuh kasur. Bernapaslah dalam posisi ini untuk beberapa menit.

4. Legs Extended Forward
Perlahan-lahan, luruskan kedua kaki Anda kedepan. Anda boleh menekuk sedikit lutut Anda, tetapi jika Anda ingin tantangan yang lebih, Anda boleh meluruskannya. Buka dada Anda, dan perlahan pegang kedua ibu jari kaki Anda seperti pada gambar. Kaki dan tulang belakang Anda dalam posisi flat. Bernapaslah dalam posisi ini untuk beberapa menit.

5. Legs Extended Forward Bend Round Back
Kemudian, dari posisi no.6, turunkan dada Anda. Jika bisa, cium lutut Anda. Gerakan ini sangat bagus untuk peregangan belakang Anda. Bernapaslah dalam posisi ini untuk beberapa menit.

6. Lying Down Knee to Chest

Perlahan-lahan, dari posisi no.5, roll-back ke posisi telentang dan bersandar pada bantal dibelakang Anda. Tekuk lutut Anda, dan peluk didepan dada. Bernapaslah dalam posisi ini untuk beberapa menit. Lakukan juga pada kaki yang lain.

7. Hamstring Stretch
Luruskan kedua kaki Anda. Dan perlahan-lahan luruskan ke atas, dan dekatkan dengan memegang pergelangan kaki dan lutut Anda, seperti pada gambar. Tahan dalam beberapa napas, dan perlahan turunkan, dan lakukan pada kaki yang lain. Ini akan membantu melepaskan segala tekanan2 yang tubuh Anda rasakan pada hari ini.

8. Half Happy Baby
Tekuk kaki Anda 90 derajat, dan arahkan telapak kaki menghadap ke langit-langit, seperti pada gambar. Tahan gerakan ini dalam beberapa napas. Lakukan pula pada kaki lainnya. Gerakan ini juga dapat dilakukan dengan kedua kaki secara bersamaan. (Biasanya saya melakukan dengan kedua kaki).

9. Bend Knee Lying Down Twist
Peluk kaki Anda, dan twist kaki Anda, seperti pada gambar. Tolehkan kepala Anda pada arah yang berlawanan dengan kaki Anda. Luruskan kedua tangan Anda seperti hurup T. Pastikan Anda juga melakukan gerakan ini pada kedua sisi.

10. Star Shape Twist
Lakukan gerakan seperti pada gambar. Pandangan Anda mengarah pada tangan yang Anda panjangkan. This is a really nice twist ;) . Lakukan pada sisi sebaliknya.

11. Knee Hug
Peluk kedua lutut Anda ke depan dada. Perlahan-lahan, gerak-gerakkan ke arah kanan dan kiri.

12. Savasana

Ini adalah gerakan yang paling saya suka =D. Yesss,, you almost there dear! Istirahatkan tubuh Anda dalam posisi ini, rileks. Anda boleh langsung tidur dalam posisi ini. Ssssttt... jangan lupa untuk berdoa sebelum tidur Anda. 

13. Sleep
Best yoga position adalah ini. Roll over ke sisi kanan (setahu saya, muslim dianjurkan untuk tidur menghadap kanan dan sapukan tangan Anda sambil membaca surat Al-Ikhlas =). Kan tadi doa tidur sudah kita lakukan di gerakan no. 12), walaupun di gambar ke sisi kiri. Tapi semua terserah pada para pembaca :D
Have a great sleep ;) and enjoy your night rest dear.

Nah, ini salah satu video Bedtime Yoga :


Source : womenshealthmag.com
Video Source : Sarah Beth

Sunday 25 August 2013

Squat Challenge

Hi reader !

I hope we are all in healthy condition.
I was reading in popsugar.com about this Squat Challenge, and i'm really excited to share this to all of you.
It's only taken 30 days, and you can get your sexy legs, i've done it till days 5 today =)
If you have any questions, do not hesitate to leave your comments below, or you can also ask or share your picture in my twitter, just follow mine @oxyg3nt :)


Here's the *.pdf file, so you can easily print it and stick it everywhere you want it.
Have a nice 'trying' =)

5 Essential Pose to Strengthen Your Core

Assalammualaikum Wr. Wb.

Hi All ^^
Hope all of us still healthy today !!!

I decided focus to write about how to strengthen our core. Despite of that, this poses also give you tight and toned tummy. REMEMBER, this poses also work for man

Photo recources : Jenny Sugar

1.
Push Up


When you do push up position, hold this pose for longer. It will strengthens your upper body and targets your core.
When you’re going down, exhale and bend your elbows, allowing them to brush against the sides of your body as you lower your torso toward the floor. Stop when your upper arms and body are parallel with the ground.
Hold here for five deep breaths. Do this for five reps.

2.
Boat


Sitting and lift your knees up to your chest. Balance on your sits (bottom of your pelvis). Keep your spine as long and straight as possible.
Slowly straightening your legs up. If your back starts to hunch, keep your knees bent. Hold for five deep breaths.
When you’re ready to take the lift. Cross your legs just below your knees, point through your toes and pull them in as close to your body as possible, without letting them touch the ground.
On inhale, hold yourself together, press your palms into the ground, engage your core and lift your body off the ground.
Come back into Boat Pose for another five breaths, then take the lift again.
Do this for five reps.

3.
Side Plank


Stay here for five deep breaths. Keep your core strong and steady. Do this for five reps every side.

4.
Crow

This pose works your abs and your upper body.
Begin Garland Pose. Place your palms on the ground in front of you. Spread and press your fingers as wide as you can.
Straighten your legs slightly, and place your knees as high up onto your triceps as possible, toward your armpits.
Lift one foot off the ground and then the other. If you can, bring your toes together.
Squeeze your knees together slightly and pull your belly button in toward your spine.
Stay here for five breaths.

5.
Headstand B

This pose require upperbody strength and balance. Keeping your feet parallel with the ground and also insanely works your core.
Begin with your hands and knees on the mat. Lower your elbows to the floor and interlace your fingers.
Place the back of your head against your palms and the top of your head on the mat. Once your head and forearms feel stable, straighten both legs and walk your feet toward your face as far as you can.
Shift your hips over your shoulder, and keep your elbows planted firmly on the mat. Lift your right leg straght up toward the sky and then your left, coming into full headstand. If you feel up to the challenge, you can try lifting both legs up simultaneously.
To move into Headstand B, slowly lower both legs down halfway, so that your thighs are parallel with the floor. After five breaths, lower your feet all the way down to the ground.

Wednesday 14 August 2013

Garland Pose

Hi reader ^^

I hope all of us still healthy and happy.

You don't have time to do exercise ? Or, you sit all day at a desk, and not moving around can cause tight muscles. That's not helping your hips, right ? I really bet your body is just craving to do Garland, also called Wide Squad or Frog. In Sanskrit, it called Malasana.


  • With your hands at the center of your heart (Prayer Position), stand with your heels on the outer edges of the mat and your toes off the mat. Squat down as low as you can. Keep your heels on the floor.
  • Separate your thighs slightly wider than your torso. While you exhale, lean your torso forward and fit snugly between your thighs.
  • Press your elbows against your inner knees and resist the knees into elbows. This will help to open your hips even further.
  • Try to keep the spine long and the knees over the feet to protect the ankles.
  • Hold the pose for five deep breaths, or as long as you want. Once you've had enough, slowly straighten your legs and come into a Standing Forward Fold to release your hips.

Standing Forward Fold

This pose is perfect for opening your hamstring, stretching the lower back, and creating a calming effect over your mind. In Sanskrit, we called this pose as Uttanasana. Also called Standing Forward Bend.

  • Center your mind and concentrate on your breath. Bring your feet together and fold forward from the hips. 
  • Grow long through the spine and relax your neck. Tuck your chin toward your chest, relax your shoulder and continue lengthening the crown of the head toward the floor to create a long spine. Straighten the legs as much as possible, and shift weight forward into your toes. 
  • Place your fingertips on the floor in line with your toes, bending your knees as much as is necessary.

Monday 12 August 2013

5 MINUTES TO STRENGTHEN YOUR CORE

Hi all,

I was reading in popsugar, and i want to share this to you reader. Why ? because i care about our healthy.
It's only takes 5 minutes to strengthen your core. The good news is you can do it at home or only in your chamber or wherever you want ^^. At least, do it once a day. It contents 10 kinds of exercises.


Nb. Images & captions sources below are from yogaworkout and popsugar.

1. ELBOW PLANK
   
  • Start in Table position (hands and knees), and lower down to the elbows. To set up proper alignment, reach the hands for opposite elbows directly under your shoulders; this is how far apart your elbows should be from one another. Keep your elbows where they are and spiral your forearms forward to interlace your fingers; pinkies press down into the mat.
  • Engaging your abdominal muscles, step one leg back at a time onto the balls of your feet, just like in Full Plank. You should have a straight line of energy from the crown of your head out through your heels.
  • Hold for 5-10 breaths (30 seconds), or when you ready, you can hold it as long as you can.

2. RIGHT SIDE ELBOW PLANK
  • Hold for 5-10 breaths (30 seconds), or when you ready, you can hold it as long as you can.

3. LEFT SIDE ELBOW PLANK
  • The opposite side of right side elbow plank. 
  • Hold for 5-10 breaths (30 seconds), or when you ready, you can hold it as long as you can.

4. UP-DOWN PLANK

  • Repeat this 5-10 times (in 30 seconds).

5. PLANK WITH LEG LIFTS
  • Hold this position 5-10 times every leg lifts. 5 breathes for every leg.

6. RIGHT SIDE PLANK

  • From Plank, bring your legs and ankles together to touch. Plant your right hand directly under your face, drop your heels to the right, stacking your left foot on top of your right, and extend your left arm straight up to the sky. Imagine a side-lying capital letter “T”.
  • Hips can either be in the straight line from your head to heels, or pressed up higher, creating a slight arc. Hips should not sink low.
  • Gaze can be down to your right hand, straight out in front of you, or up toward the left hand. Hold for 5-10 breaths.

7. LEFT SIDE PLANK
  • The opposite side of right side plank. 
  • From Plank, bring your legs and ankles together to touch. Plant your left hand directly under your face, drop your heels to the left, stacking your right foot on top of your left, and extend your right arm straight up to the sky. Imagine a side-lying capital letter “T”.
  • Hips can either be in the straight line from your head to heels, or pressed up higher, creating a slight arc. Hips should not sink low.
  • Gaze can be down to your left hand, straight out in front of you, or up toward the right hand. Hold for 5-10 breaths.

8. PLANK

  • Starting in Table position (hands and knees) be sure your hands are directly under your shoulders, with your fingers spread wide.
  • Extend one leg out at a time behind you on the balls of your feet, so you are in a high push-up position. Think about making one straight line from the crown of your head to your heels.
  • Abdominal muscles are pulled in toward the spine, and gaze is straight down between your hands. Hold for 5-10 breaths. *Option to modify by dropping the knees.

9. ADVANCE BRIDGE / TABLETOP
  • Hold this pose for 30 seconds.

10. SUPERMAN
  • Lie on your stomach with your toes flat on the floor; chin resting on the ground.
  • Keep your legs close together with your feet lightly touching each other.
  • Now stretch your arms out to the front as far as you can.
  • Take a deep breath in and now lift your chest, arms, legs and thighs off the floor. You resemble a flying super hero - Superman ! Spread the smile on your face. Rather than making an effort to raise your hands and legs more, make a gentle effort to stretch your arms and legs away from your torso. So, feel the pull that is occuring at both ends. Ensure that your elbows and knees are not bent.
  • Keep breathing with awarness; keeping your attention on the stretch.
  • As you exhale, gently lower your chest, arms and legs. 
  • Repeat this pose 5-10 times in 30 seconds.


Thank you for reading ^^
Leave your comment if you have any questions (=

1st Day

Assalammualaikum Wr. Wb.

Hi all.. today is the first day I'm getting back to work after one week Eid al-Fitr holiday.
And also,,, my first time writing blog again after two years. 
Here, I try to write more about my routine activity and activity which I'm interested about.

So,, I hope you find this interisting and also useful. ^^ HAPPY READING .